

Lectures & large teaching events
Lectures provide students with an opportunity to learn content from the experts. Digital can enhance learning opportunities and open the doors to new ways of working, making learning more inclusive for all involved. Take a look at the tips below on how you can embrace digital in your teaching to improve the student experience.

1. Provide lecture recordings
Recorded lectures provide excellent revision opportunities as well as access for students who can't attend in-person lectures. You can pre-record lectures using Panopto, eStream, PowerPoint, or Teams. When pre-recording lectures, it's suggested to break up sessions into 15 min chunks. Panopto is installed in various lecture theatres and seminar rooms, ready to record in-person teaching. Remember to make sure your content is accessible - see the Accessibility & inclusion guide.
If you require a professional video recording of an in-person event, you could use the Digital Media Service which produces videos for staff at Lancaster campus (for teaching and learning activities).
Tip 1 accordion accordion
Challenges
- Maintaining student engagement in recorded content.
- Keeping a presence in the on-demand approach to a lecture.
Solution
Breaking the traditional 60 minute lecture into 4 x 15 minute chunks to maintain concentration and allow segments of reflection and assessment to be built in between watching.
- Record a 15 minute lecture recording e.g. Panopto, eStream.
- Ensure videos are accessible, with captions added.
- Upload videos to course Moodle space - see adding individual items in the Introduction to Moodle online course.
Notes
- As an alternative to recording 15-minute videos, in eStream you can split a longer video into shorter chapters by clicking Chapters > Create Chapter from the main page for that video.
- To maintain a presence in recorded lectures, start the session with your camera on and give students the opportunity to connect with you. This can be left on throughout or switched off once you get started.
- Recording your screen helps present a range of content. This offers opportunities to talk through PowerPoint slides, commentate on video segments, highlight and elaborate on research papers, documents and websites etc.
- Students with physical, or learning disabilities may find recorded lectures particularly useful. The facility to have lectures captioned with a downloadable transcript are additional inclusivity measures that support individual student needs. Additionally, with the recorded content, the option to search for key terms is a useful capability when reviewing the content.
Online training
- Online course: Video production
- Online course: Engaging students online in asynchronous activities
- Online course: Introduction to Moodle
Recorded training sessions
Solution
- Log in to the PC in the room
- Attach the lapel microphone, and ensure it is turned on and is not set to mute.
- Use the AMX panel to select the device you wish to record, normally PC.
- From the PC, open Panopto.
- Select the content you wish to record. This can include microphone, camera, PowerPoint slides and PC screen recording.
- Set a name for your recording and choose a folder to save into, usually the Module folder.
- Click Record to begin the recording, and progress through your presentation as normal.
- Click Stop to finish and save your recording.
- Generate captions for accessibility.
- The recording can then be uploaded to Moodle.
Notes
- When screen recording in Panopto it is important to remember that everything shown on screen will be captured. Ensure that you have turned off notifications for programs such as Microsoft Teams, and have closed down any programs containing information you do not wish to be shown on the recording.
- Once the video is saved you can use the Panopto editor to trim out parts of the video e.g. the start and end of the video.
- To make the recording more interactive, you can add a quiz into a Panopto recording promoting more audience engagement.
Online training
- Online course: Introduction to Moodle (For staff)
- Online course: Video Production
Recorded training sessions
2. Add interactivity to lecture recordings
Include formative assessments, quizzes, surveys, and other interactive elements to make lectures more engaging and effective. You can use Panopto or Lancaster eStream to add interactive tasks to your videos. These short interactions can encourage students to reflect on the topic and check their understanding.
Tip 2 accordion accordion
Challenges
- Watching pre-recorded lectures alone may not be the most effective way of learning with self-regulation and feedback limited.
- Distance learning students can feel isolated and disconnected with learning activities.
- Managing the scale of large cohorts at a distance and maintaining engagement.
Solution
-
Create your lecture recording video (15min chunks per recording e.g. Panopto, eStream).
-
Questions can be added into your video:
-
Ensure the video is accessible
-
Share the video via Moodle
-
Review or export the results from the quizzes once students have taken the assessment
Notes
- The addition of asynchronous learning activities (discussion forum, chat, quizzes etc) can offer optimal engagement and motivation from students.
- You can add formative assessment checks into videos in eStream, offering you the opportunity to pose questions at points of your lecture that normally may not be possible. You can then use these results to create a discussion using either Microsoft Teams or Moodle (or a combination).
Challenges
- Maintaining students’ engagement in recorded content.
- Achieving an overview of students understanding on a topic during asynchronous lectures.
- Effectively planning follow-up seminars where there is no evidence of student engagement or a lack of feedback.
Solution
- Create your lecture recording video
- Questions can be added into your video:
- Ensure the video is accessible
- Share the video via Moodle
- Review or export the results from the quizzes once students have taken the assessment
Notes
- The addition of asynchronous learning activities (discussion forum, chat, quizzes etc) can support students’ understanding through assessment for learning tasks. This allows the teacher to capture feedback from a large number of students.
- There are a range of question types ranging from multiple choice, Likert scales and ranking to longer free text answers. These question types offer the ability to tailor to different learning styles.

3. Add interactivity to live lectures
You can use a variety of digital tools to make your in-person lectures more engaging and interactive. They can help get an overview of the group's opinion and students are often more willing to participate in anonymous polls. Mentimeter can be used to create instant polls or to integrate live polls and questions into a PowerPoint presentation. Moodle Active Quizzes can be used to conduct a live Moodle quiz with a specific Moodle module or group.
If you're doing an online synchronous session, you can do quick polling in Teams to gather quick feedback to prompt discussion. Take a look at the Engaging students online in live sessions online course to develop your skillset in active learning.
tip 3 accordion accordion
Challenges
- Asking questions to a large number of students simultaneously.
- Creating groupwide polls quickly and easily.
- Having students’ feedback on areas to continue to focus after a session.
Solution
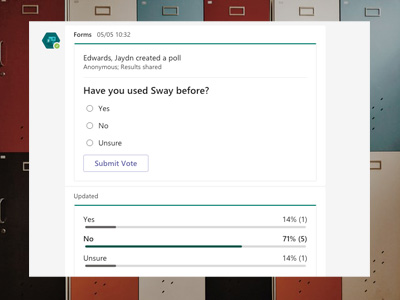
- In a Teams chat or conversation, type @Forms and press space
- Type your question, followed by up to six options, separated by commas, e.g.:
On a scale of 1-5 how confident are you with …? 1, 2, 3, 4, 5

- Press enter or click the Post button – this will create an instant poll:

Notes
- Polls are not anonymous – everyone will be able to see who has voted for what.
- Answers don’t have to be numeric, and can be full sentences; just make sure to separate them with commas.
- The quick polls can be used to see what area of the topic students would value having additional support on. This can be effective to provide useful and targeted support material in preparation for subsequent sessions.
Relevant online training
- Online course: Group collaboration with Microsoft Teams
- Online course: Meetings and teaching events in Microsoft Teams
- Online course: Gathering data online using Qualtrics and Microsoft Forms
4. Use a digital whiteboard
You can use applications such as Microsoft Whiteboard or Microsoft OneNote whether you are teaching online or in-person. This allows you to keep a record of what you have written on the board during the lecture, that students can revisit later on. You could give your students access and use the whiteboard as a collaborative space. This could either be during the lecture, or asynchronously, with students able to add their thoughts later on. If you do use a physical whiteboard, you can upload a photo of it to Whiteboard or OneNote and continue to expand upon it as an electronic resource.


5. Complement with online asynchronous learning activities
To complement your lectures, you can use your Moodle or Teams space to add learning activities, such as forum discussions, continuous online chat, or interactive tools such as quizzes and surveys. Learning activities help structure independent learning and encourage students to reflect on their learning and interact with others. You could use the Moodle feedback activity or Microsoft Forms to collect informal feedback from students. See the Asynchronous online activities guide for further examples.
tip 5 accordion accordion
Moodle feedback activity
You can use the Moodle feedback activity, which also manages anonymous responses and display to student choices. This involves:
- Create and configure a Feedback activity in Moodle
- Add questions to the Feedback activity
- Save activity template
- View collated feedback from students
Microsoft Forms in Moodle
- Go to Microsoft Forms and create a new Form
- Add the questions you wish the students to respond to. These can include:
- Multiple choice questions e.g. if you want a student to select from a specific list of areas for the revision session to focus on
- Text entry, e.g. for open ended questions such as comments and suggestions
- Ranking, e.g. for ranking the areas they feel most confident about to the least
- Rating, e.g. to allow the student to rate aspects of the session out of 5
- Share the form with the students by posting the link (URL) to the Moodle space - see Adding individual items section of the Moodle online course.
- Review responses from within Microsoft Forms, or export to Excel
Notes
- These instruction are for collecting informal feedback.
- LUMES evaluations continue to run at the end of modules.
Relevant training
- Online course: Gathering data online using Qualtrics and Microsoft Forms
- Online course: Introduction to Moodle (For staff)
Challenges
- Giving whole class feedback without a physical room to deliver in.
- Engaging students and actioning the feedback given.
- Creating feedback that is accessible and meaningful.
Solution
-
Prepare the course rubric or assessment criteria on screen.
-
Use screen capture software to record your screen with audio narration giving feedback, referring to and highlighting appropriate areas of the assessment criteria.
-
Upload the video recording to Moodle.
Notes
- Without the physical space to deliver feedback, video feedback can be an effective approach.
- The opportunity to have the course rubric or assessment criteria on screen as it is discussed can provide an excellent opportunity to create multimodal feedback for students.
- It would allow students to have both the document and the audio commentary to refer to that can be re-watched and paused at specific points.
- An assessment activity at the end of the video can prompt students to consider how this will be actioned in future assignments and offer the academic a sense of how effective the feedback has been.
Relevant training
- Online course: Engaging students online in asynchronous activities
- Online course: Introduction to Moodle (For staff)
- Online course: Video Production
Challenges
- Engaging students in asynchronous activity usually completed face to face.
- Creating the social interaction around the audio-visual content.
- Linking the asynchronous activity to other course activities.
Run a screening via Moodle
- Select the relevant film from the range of institutional resources (make sure the video is accessible) and acquire the link for sharing with students
- Post the link to the relevant Moodle space - if sharing via eStream, you can embed the video on your Moodle space.
- Add a forum for discussion, if needed
Run a screening via Microsoft Teams
- Create a channel within an appropriate Teams space to host the screening.
- Select the relevant film from the range of institutional resources (make sure the video is accessible) and acquire the link for sharing with students.
- In the channel you have created, add a Website tab, which links to the film via your chosen resource.
- Use the Posts tab in the channel to provide guidance and set context (e.g. for discussion, which could also take place in this tab).
Notes
- Make sure any videos you share with students are accessible. if you are uploading your own material, you need to add captions, including audio descriptions.
- The chat/posts/forum facility offers many ways to engage students in discussion and can be facilitated by staff and students. Each film screening could have a designated facilitator to start discussion points and keep the engagement throughout the time frame (a week being optimal).
- In Teams, students can use text, emoji, memes and gifs to communicate. For those using a mobile phone, voice messages are also an option for those less confident communicating in written form.
- You can use polls or questions to capture a variety of feedback from the event which could be used to shape future learning activities. You could also use Microsoft Forms within Microsoft Teams to capture feedback.
Relevant training
- Online course: Introduction to Moodle (For staff)
- Online course: Group collaboration with Microsoft Teams
- Online course: Meetings and teaching events in Microsoft Teams
Who was involved?
Dr Michelle To, with the support of ISS
What did you do?
I used Xerte to present my asynchronous lectures in PSYC214 Statistics (in Psychology), and received an overwhelming amount of positive feedback from students. Many who had previously disliked Stats even told me they enjoyed the lectures.
How did you do it?
I first took the Xerte online course offered by ISS, then I also completed an Open University course entitled Take your teaching online. From both modules, I designed and created lectures that were deemed highly engaging.
What were the key takeaways?
I used Xerte for asynchronous lectures but they can also be useful for labs, workshops, as additional resources for students. Outside of teaching, you can use Xerte to disseminate research findings to the general public, and as a recruitment tool to present university courses and facilities to potential students.
The presentation of teaching material is extremely important and Xerte is a great platform for this. It may take a bit of practice to get things started, but once you know how to use it, you can incorporate it into so many different aspects of your work. ISS has been great at helping out too, so you feel supported when you need assistance.
Any other info?
I have just really enjoyed preparing and producing my lectures in Xerte, and the students really loved it!
Here are two of the many pieces of positive feedback PSYC214 received in the evaluations:
"Michelle’s teaching method is amazing!!!! she explained everything really well which really helped me understand everything, i also loved the Panopto system with mini quizzes whilst watching the lectures so that you know if you’ve understood it before you move on, i found that those helped me a lot."
"The program that Michelle used on Moodle to complete the lessons. I like the interactive aspect of the lessons and lectures being broken down into smaller videos. Knowing what answers we got right and wrong on the WBAs was very helpful and the many resources that Michelle put out for us."
Who was involved?
Dr Michelle To, with the support of ISS
What did you do?
I awarded badges to PSYC214 students who completed weekly web-based assessments and the class test. This simple digital tool improved students’ engagement with the coursework and students have told me they looked forward to receiving the next badge.
How did you do it?
First, I used Adobe Spark to create by badges. The software is online and very easy to navigate. After producing and saving the badges onto my computer, I used Moodle to manage and award them to students. Moodle allows you to set up how and when you would like your badge to be awarded. In my case, students were automatically awarded badges when they completed an activity (a weekly web-based assessment). But you can also award badges manually to selective students. There is also the option of awarding a badge based on previously awarded badges, so you can award a Gold badge for those who have gained the X, Y and Z badges. Students also receive an email each time they receive a new badge, so that’s an additional positive reinforcer.
What were the key takeaways?
Badges can take a bit of time to set up but once you have them added onto Moodle, they can be awarded automatically. Students on my course have really appreciated earning and collecting the badges, even though they carried no value in terms of marks.
Any other info?
Badges are easy to create and award. It is a digital tool that enhances students’ engagement with the coursework and their overall learning experience.
One student wrote in the PSYC214 module evaluations, under What were the most valuable parts of the module: “the way the lectures were taught. I also really liked the badges when we had completed that week's WBA, it made me really happy.”
6. Be inclusive and accessible
Make all related teaching and learning materials available at least 3 days before the start of the week that students are expected to watch asynchronous lectures. See the Lecture specific accessibility expectations in the Accessibility guide for further information.

Apps to help with this: