Anaconda
Anaconda® is a Python distribution and package management system. It provides an installation of Python and a way to create "virtual environments" that can contain different Python version and software packages required for a specific task.
Important
This tutorial describes installing Anaconda on your own computer. It also describes creating new virtual environments and packages within those environments. For the PHYS281 course you only need to be able to install Anaconda. The information on creating environments and installing packages is just provided as additional useful information, but is not required. If you know what you are doing, you are of course welcome to use whatever package management tools you like (e.g., pip) instead of Anaconda, in which case you can skip this section.
Installing Anaconda
The official instructions for installing Anaconda on a variety of operating systems can be found at https://docs.anaconda.com/anaconda/install/, but we will also go through the steps below.
On Lancaster University machines on campus, Anaconda can be accessed through AppsAnywhere at https://apps.lancaster.ac.uk/.
Note
The full Anaconda installation will require just under 3 Gb of space on your computer.
For users who are confident using a text-based terminal there is a much lighter weight installation that can be used called Miniconda, which does not provide many of the graphical user interface tools.
- Visit https://www.anaconda.com/products/individual and scroll down until you see the Download options:
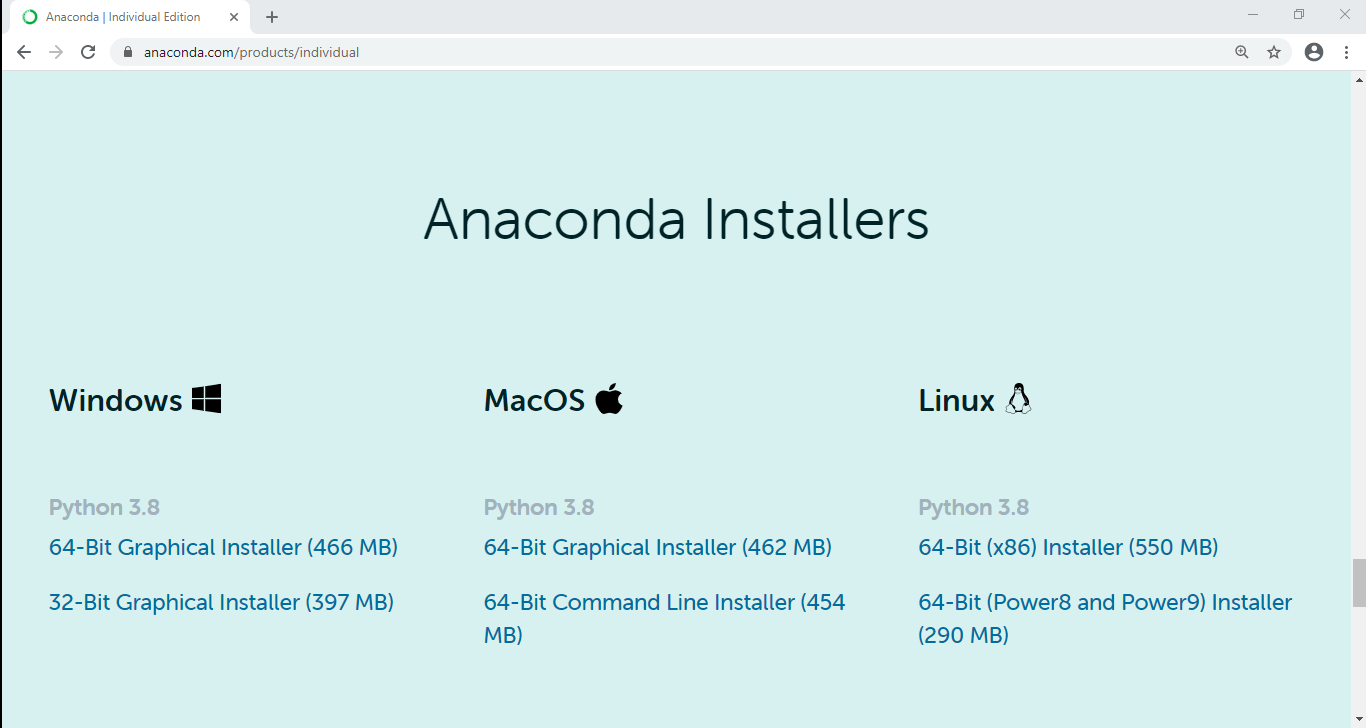
- Under the "Windows " option click on "64-bit Graphical Installer" to download the installation executable.
- Click on the downloaded executable to start the setup (often via an icon now located at the bottom of you browser window), which should provide a window with instructions to follow:
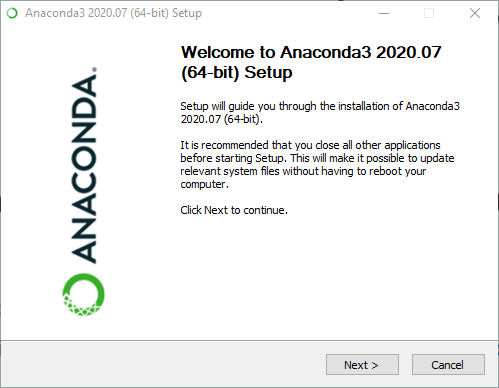
- Click the Next > button to begin installation.
- Click I Agree in the "License Agreement" window.
- On the "Select Installation Type" window you can either select to install for "Just me" or "All users". If you are the only user of your machine then either option is fine. If there are multiple users (i.e., it's a shared machine) then "Just me" can be used.
- On the "Choose Install Location" window, unless you have a preferred install location for
software, leave the install location as the default option. In general, if installing on
your own machine, this will be "
C:\Users\<username>\anaconda3", where "<username>" will be replaced with your own user name on the machine. - On the "Advanced Installation Options" window leave the tick in the box next to "Register Anaconda3 as my default Python 3.8" and click the Install button.
- Once installation is complete continue clicking though with the Next > buttons and finally click Finish (if you leave the check boxes on the final window ticked, then links to tutorials will open in your browser).
Once installed, click on the Windows start button (the in the bottom left of the screen), and the menu should now contain "Anaconda3 (64-bit)", which can be clicked on to reveal several installed programs.
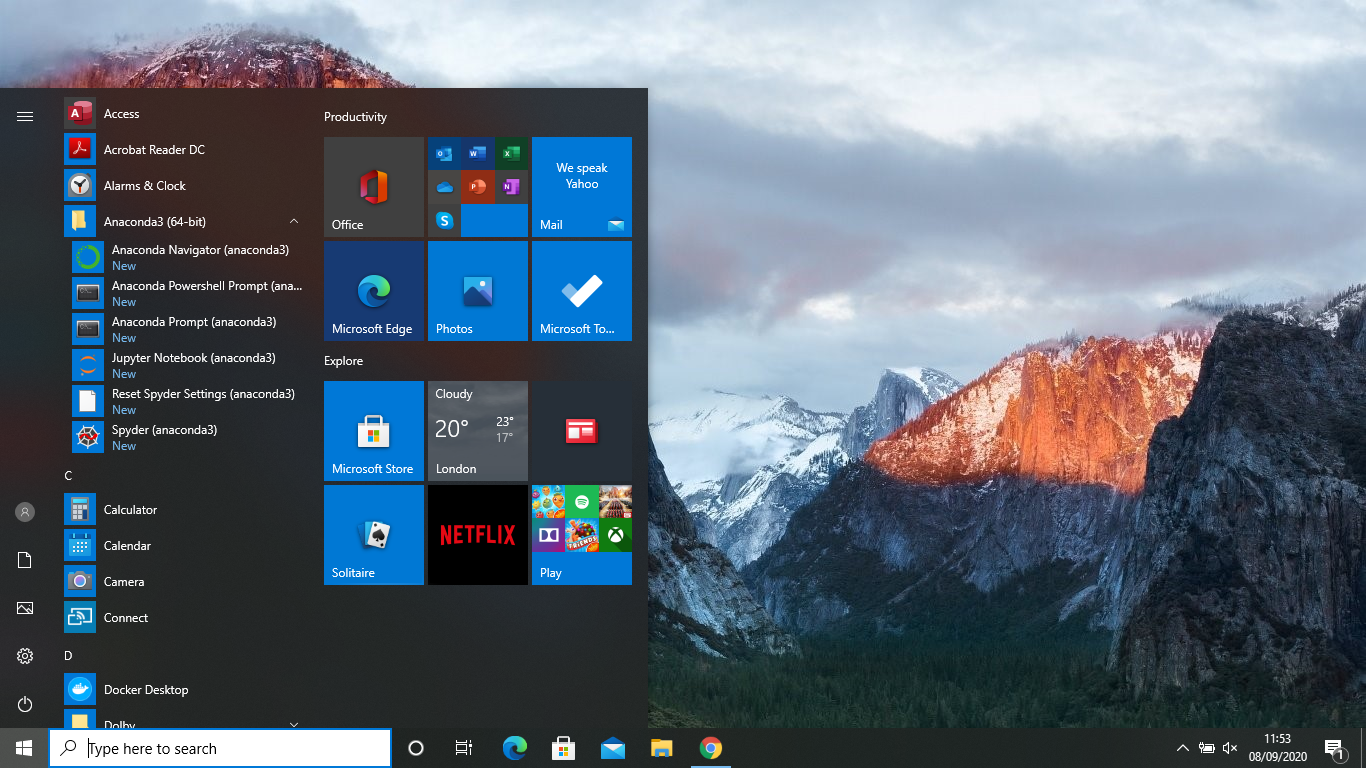
Alternatively, type "Anaconda" into the search bar to see the installed programs.
- Visit https://www.anaconda.com/products/individual and scroll down until you see the Download options:
- Under the "MacOS " option click on "64-bit Graphical Installer" to download the installation executable.
- Click on the downloaded file and follow the instructions as with the Windows installation.
For Linux users we recommend just installing the lightweight Miniconda package rather than the full Anaconda installation (you can still install the full Anaconda package if you want). Instructions for installing Miniconda under Linux can be found here, which we summarise below.
Note
The command line program that gets installed by Miniconda is just called conda, which
will be used in some of the examples below.
The instructions below are those for installation via command line only.
- Download the latest Miniconda installation file from https://repo.anaconda.com/miniconda/Miniconda3-latest-Linux-x86_64.sh either via your browser or from the command line with, e.g.,
wget https://repo.anaconda.com/miniconda/Miniconda3-latest-Linux-x86_64.sh
- In the directory that you downloaded
Miniconda3-latest-Linux-x86_64.shrun:
bash Miniconda3-latest-Linux-x86_64.sh
- Follow the on screen instructions. Hold down Enter to scroll through the license agreement and type
yesto accept it. - Press Enter to accept the default installation location, unless you have a specific location where you want it installed.
- When asked if you wish the installer to "initialize Miniconda3 by running conda init" type
yes.
To test if Miniconda is installed, open a new terminal and type:
conda info
If correctly installed the conda version and other information should be printed to screen. If
you open a new terminal the command prompt should now begin with (base), which is the name
of the default conda environment.
AppsAnywhere can be used to access Anaconda and Visual Studio Code from a machine on campus or via a virtual machine. It is not recommended to use AppsAnywhere on your own machine as any internet connection issues will cause this to be very unreliable.
Note
If you have problems installing Anaconda on your own machine then as a back up you can instead trying using a virtual machine provided by the university through your web browser. Open a web browser and visit https://mylab.lancaster.ac.uk.
- Open a web browser such as Google Chrome. In most cases this should automatically open on the AppsAnywhere page, if not visit https://apps.lancaster.ac.uk/.
- Scroll down to find the app named "Anaconda with Visual Studio Code" or type "Anaconda" in the search box to find it.
- Click to launch the app, which should quickly open up a window containing Visual Studio Code. Close that window (it will not work properly) and wait until the Anaconda app fully downloads (unfortunately this may take 10 minutes or more).
- Follow the instructions below to access Anaconda Navigator.
Note
You cannot create new environments, as described below, when using Anaconda via AppsAnywhere. However, all the packages you require will be available by default.
Anaconda Navigator
If you have installed the full Anaconda package a program called "Anaconda Navigator" will be available to use. It allows you to launch a range of applications, create new environments containing different Python packages, and install new packages.
If you click on the Windows start button , then click on "Anaconda3 (64-bit)" it will reveal a drop down menu containing "Anaconda Navigator (anaconda3)". Click on that button to open the Navigator:

It will open within the " Home" tab and show a set of applications that can be launched. The most relevant of these for this course is:
- Powershell Prompt: this opens a terminal program for running commands.
Note
After installing VS Code (a text editor that is useful for writing code) as described in another tutorial, this will also be available as an application within Anaconda Navigator.
Above the table of applications the Navigator says "Applications on base (root)". Here base
is the name of the default virtual environment that Anaconda creates. This environment has
various Python packages installed in it by default. This set of packages can be seen by
clicking on the "Environments" tab:
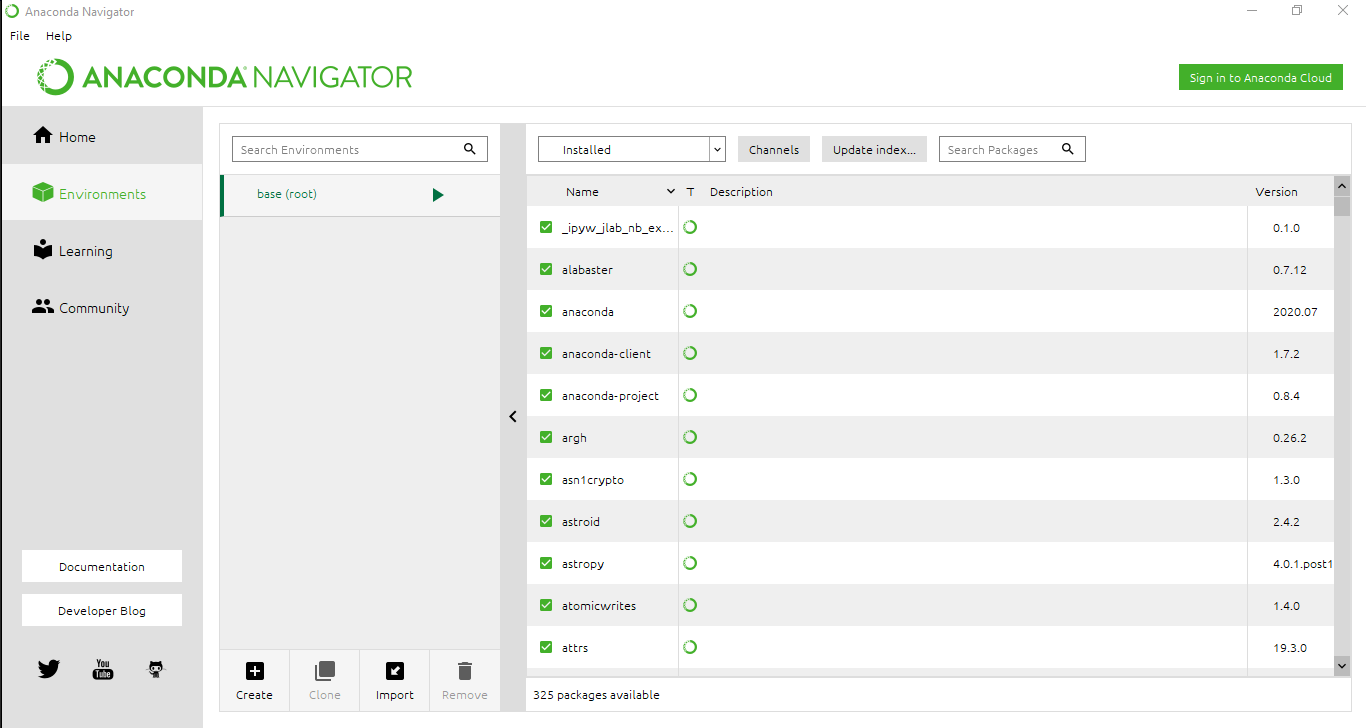
This will have a list of the environments, which after installation will only contain
base (root) and then a list of installed packages (along with their version number).
By scrolling down you should find that this list includes numpy, matplotlib, and scipy,
which are useful for this course.
In Finder type "Anaconda Navigator"...
Creating a new environment
For this course, every Python package you should need is installed within the Anaconda base
virtual environment. However, as good practice for future projects, it is useful to know how to
create new environment.
Instructions for creating a new environment using either Anaconda Navigator or via the command line in a terminal are given below:
After opening Anaconda Navigator (as described above) click on the " Environments" tab on the left hand side of the screen. At the bottom of the middle panel click on the "Create" button to open up a new dialogue box:
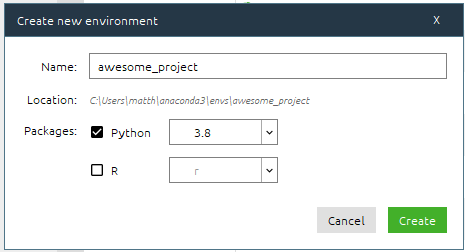
Type the name for your project, e.g., awesome_project, select the "Python" tickbox and the
Python version (defaulting to 3.8), and click Create. Creating the environment will take
a bit of time while Anaconda downloads and installs the required packages. It will then appear
listed under the base (root) environment and the packages it contains will be shown.
A new environment can be create using a terminal (e.g., the Anaconda Powershell prompt in Windows or the default terminal program on Mac OS or Linux). To start open the terminal (in Windows use the start menu or search bar to find "Anaconda Powershell Prompt", or launch it via the Anaconda Navigator).
Warning
On Windows, the Anaconda installation is not available by default within the normal "Windows PowerShell", so make sure to use the "Anaconda" version.
Create a new environment by typing:
conda create -n awesome_project
where you give the name of your environment by supplying it after the -n flag, which in this
case is awesome_project. By default the environment will contain a Python 3.8 installation,
but you can specify a different Python version using the python command, e.g.,:
conda create -n another_awesome_project python=3.7
Using a new environment
Once a new environment has been created you can then run code within it making use of the specific Python version and packages installed within it.
Within the Anaconda Navigator " Home" tab you can switch between environments using the dropdown menu next to "Applications on":
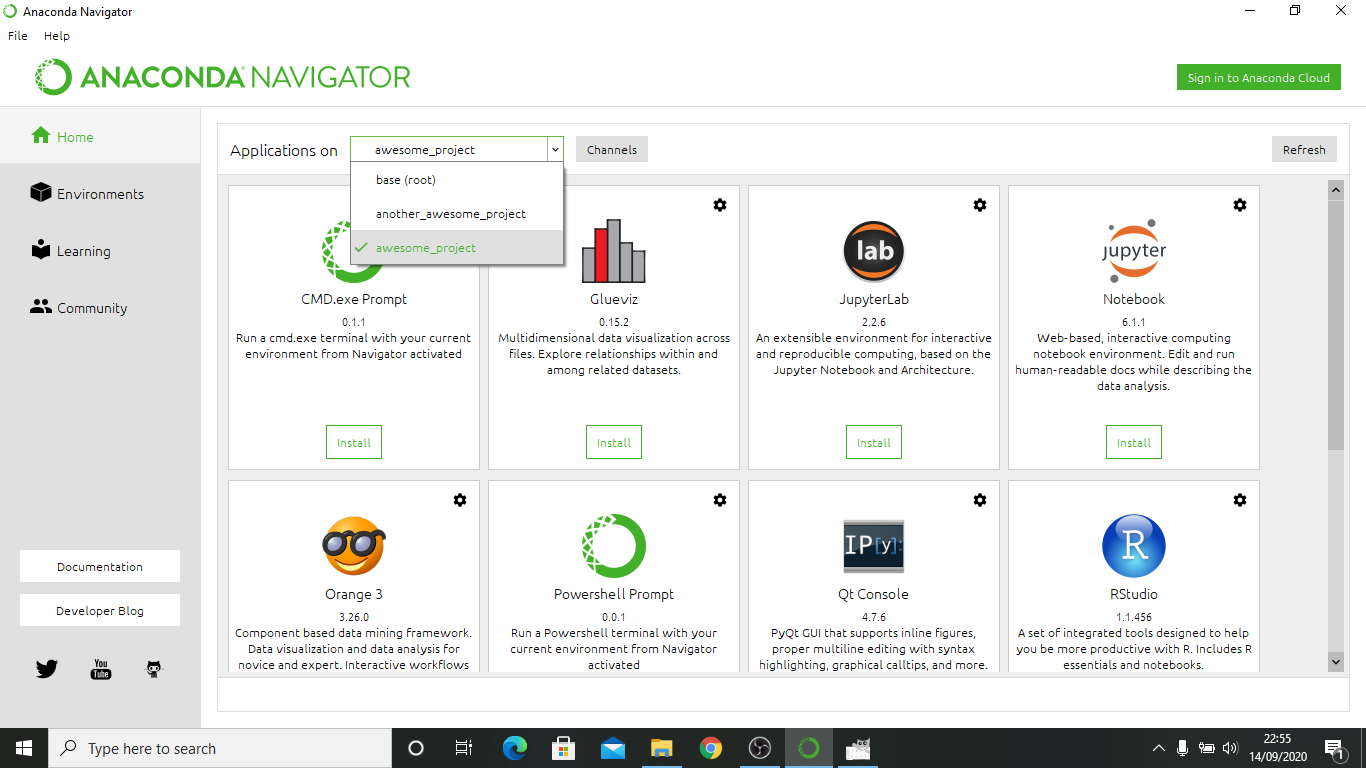
Not all of the applications shown will be installed in the new environment, so you may need to click on the Install button below the required application.
You can then launch the required application within the new environment by click on the associated Launch button, e.g., the one below Powershell Prompt.
To switch between environments in a terminal you can use the conda activate command, e.g.,:
conda activate awesome_project
The command prompt should now start with the name of the environment in brackets, e.g.,
(awesome_project). If you start a Python terminal session
it will use the version of Python installed in that environment and have access to that
environment's packages.
To move back out of a particular environment you can use:
conda deactivate
Installing packages
Within an environment you can install Python packages that you require so long as they are available either within the Anaconda Cloud or the PyPI package repositories.
In Anaconda Navigator, click on the " Environments" tab, and in the middle panel select the environment into which you want to install a package. Select the dropdown menu that says "Installed" and select "Not installed". Then search for the name of the package you want to install, e.g., numpy, in the search bar.
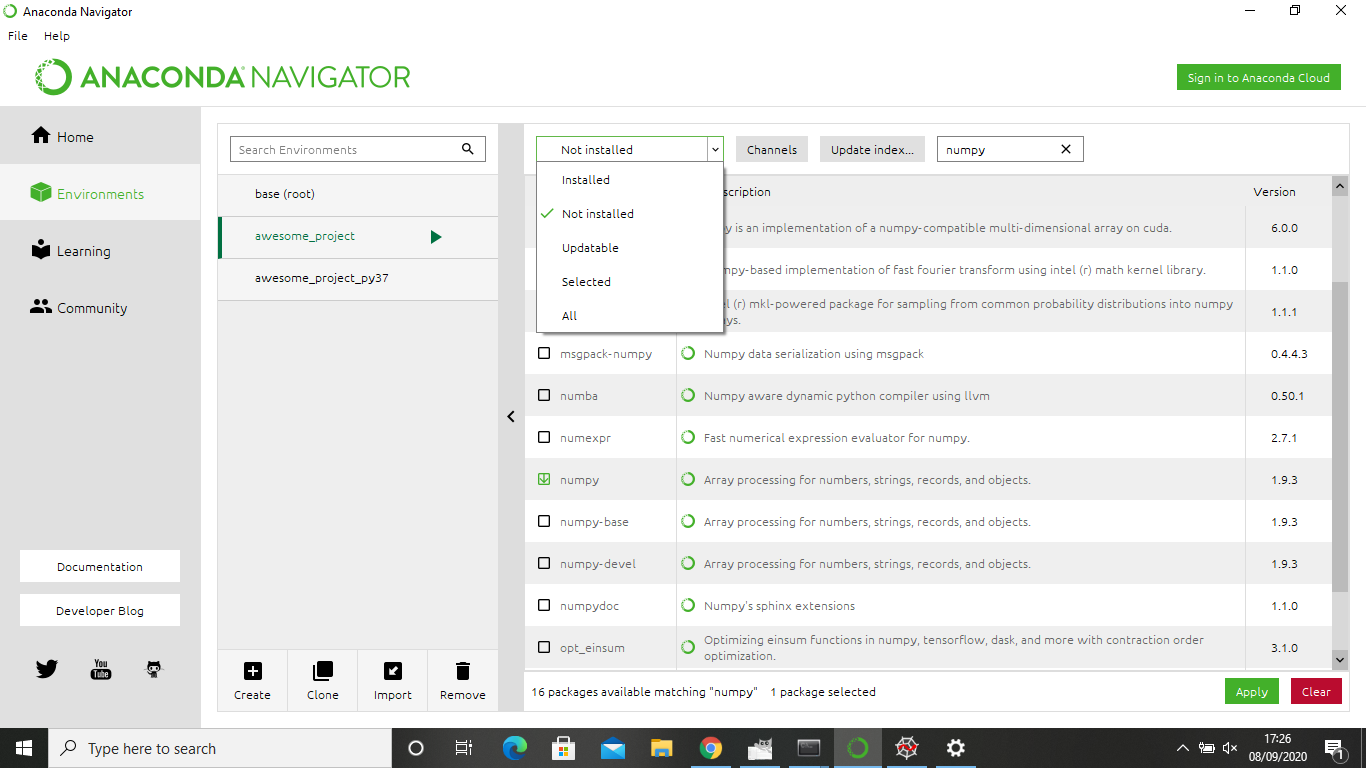
There may be multiple package that are found, but scroll to find the one with the exact name you are after and click in the checkbox next to it. Boxes saying Apply and Clear will appear in the bottom right of the window. Click on Apply. A dialogue box will then appear showing then packages that will be installed. This will often show more than just the package that you selected as many packages depend on other packages and therefore require then also to be installed. Again click Apply to install the package(s).
Note
You can select multiple packages and install them all at once.
Once installed, that package will be available to import when running Python within the associated environment.
Note
Many popular packages are available via the conda-forge
channel. To
allow Anaconda Navigator to find these, click on the "Channels" button next to the
environment name menu, click "Add" and type in conda-forge.
To install packages using the terminal you can make use of either the conda install
command, or the pip install command.
First, activate the environment into which you want to install a package, e.g.,:
conda activate awesome_project
then, to install numpy, for example, you could use:
conda install numpy
Note
Many packages are available via either conda install or pip install. In general,
installing packages using conda install takes a bit longer as it will also manage
and install non-Python dependencies of a package.
If you can, stick to using conda install. However, sometimes pip install is
required if the package is only available via PyPI.
If you want a particular version of a package then you can supply that information with, e.g.,
conda install numpy==1.18.1
Note
Many popular packages are available via the conda-forge channel. To install from this channel you can do:
conda install -c conda-forge <packagename>
If using Anaconda via a terminal, a "cheat sheet" showing most of the basics commands can be found here.