Warning: Undefined array key "template" in /export/depts/users/oed-2021ugconference/wp-content/themes/lancaster2021/functions.php on line 215
Liam Winder – 2021 UG Conference
LANCASTER UNIVERSITY 2021 UNDERGRADUATE RESEARCH CONFERENCE
10th MARCH - 17th MARCH 2021
/
Liam Winder

Liam Winder

Engineering and Science (B&FC) | Year 3 | Degree: B. Eng. (Hons) Mechatronic
The Importance of High Voltage Harness Strategy in Medium Duty Battery Electric Vehicles

The demand for ultra-low and zero emissions in urban areas to improve air quality is at an all-time high. Manufacturers must act in developing their electric powertrain products in time to aim to be market leaders with new technology. The key challenges that arise with this technology are focused on the safe installation of these systems. The electrical architecture must be robust enough to ensure the system remains safe in all vehicle applications as well as in changeable weather conditions. The routing of the cabling is considered a key element of the design to ensure the safest and most cost-effective solution is adopted.
In battery electric vehicles, the criticality of the harness strategy is vital in the overall safety and equal wear of the Rechargeable Energy Storage System (R.E.S.S). This paper analyses the effects of High Voltage Impedance on Low Voltage Systems. It also considers the key factors in designing and routing High Voltage (HV), Alternating Current (AC) & Direct Current (DC) cabling in Medium Duty Trucks. Cable specific software was used to design the harnesses. These designs are imported into a fully representative vehicle within Computer Aided Design (CAD) software. Using a variety of cable manufacturers, the possible imbalance to the R.E.S.S units was calculated and used to develop the system further and conclude the findings.

Email

Liam Winder
 
Liam Winder

Liam Winder

Engineering and Science (B&FC) | Year 3 | Degree: B. Eng. (Hons) Mechatronic
The Importance of High Voltage Harness Strategy in Medium Duty Battery Electric Vehicles
What is High Voltage?

In vehicles, High Voltage is anything greater than 60 Volts Direct Current (DC), but less than 1,500 Volts DC.

 30 Volts Alternating Current (AC) This standard is defined in ISO 6964-3 as a class B Voltage.

Why do we use High Voltage?

The purpose of using 'High Voltage' for Electric Vehicles is that larger voltages offer greater system efficiencies through reduced resistance. In vehicle systems, especially haulage vehicles, significantly more energy is required to move the vehicle due to its size, weight and the possibilities of what could be transported.

This means everything needs to be upscaled when compared to installation in a passenger car.

Is High Voltage dangerous?

In essence, yes. However, there are more influences required to make it dangerous than voltage alone. 

For example, taking Ohms Law, the amount of current that would pass through a body is the result of the voltage passing through the body, divided by the persons resistance.

The threshold of pain will arise at around 5mA DC, 1mA at 60Hz AC which is considerably low. This signals all electrical systems can be dangerous, not just High Voltage.

The purpose of the project is to identify the key characteristics and the importance of routing High Voltage Cabling.

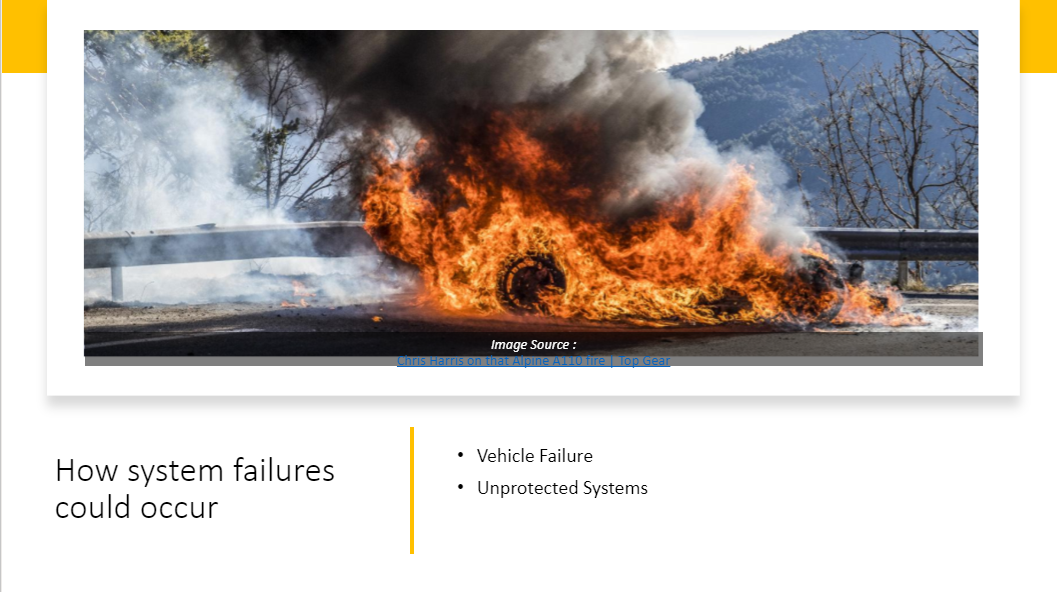
Many manufacturers are pushing forward to get a vehicle to the market, but are the dangers of High Voltage truly understood?

No formalised standard is currently constructed regarding the safe handling and installation of these cables. This thesis identifies a real-world application whereby currently, there is limited research.

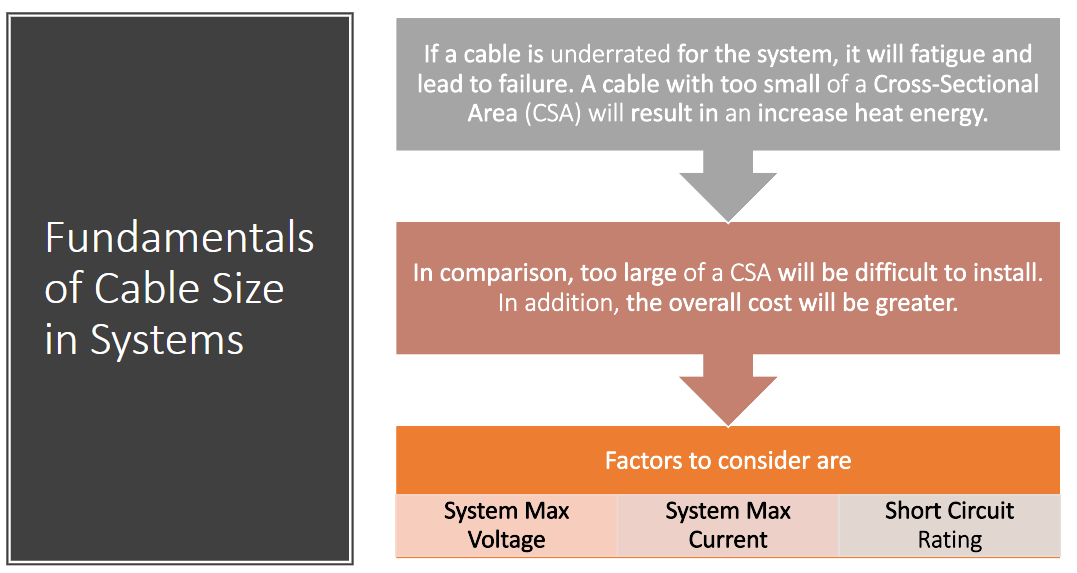
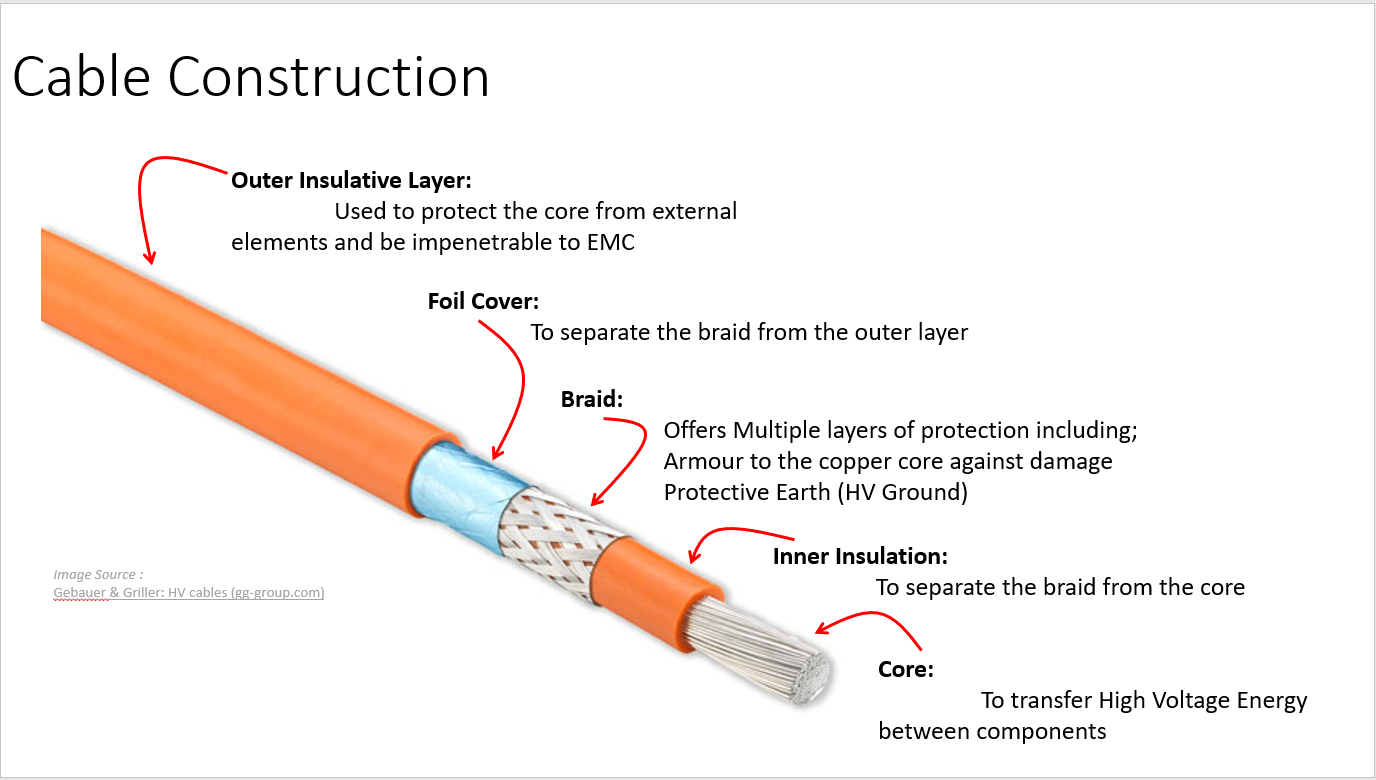
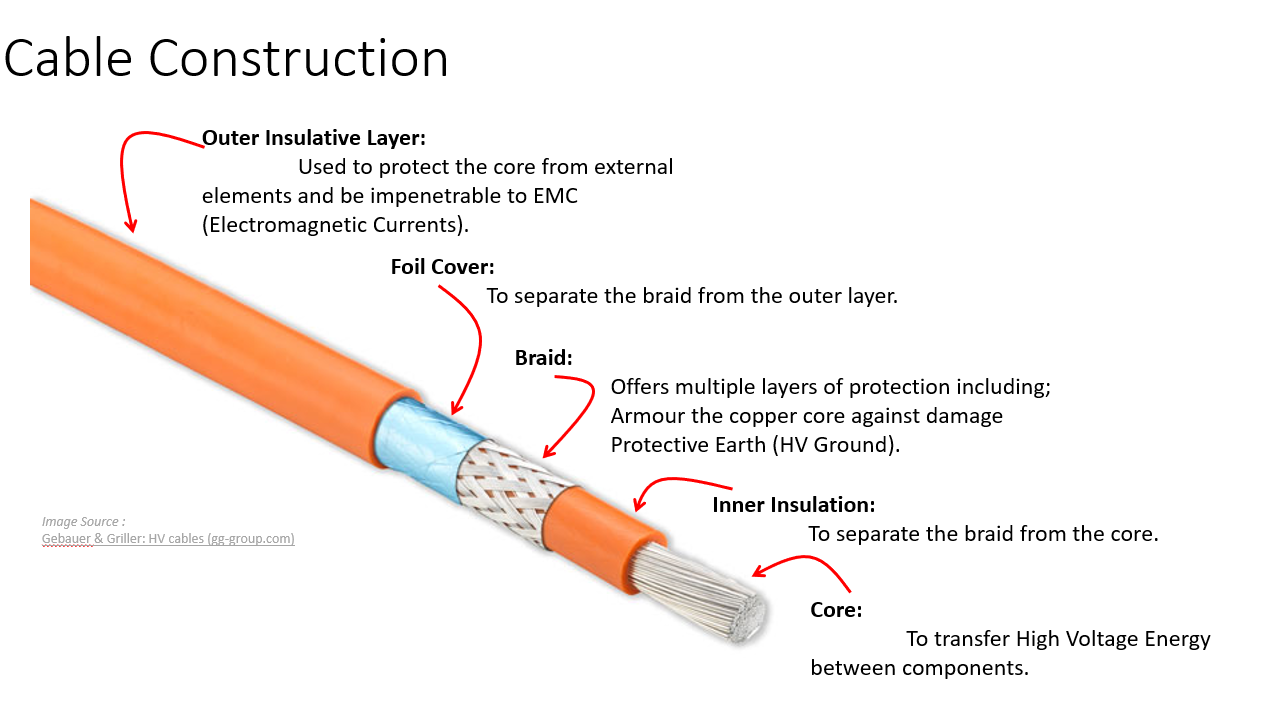
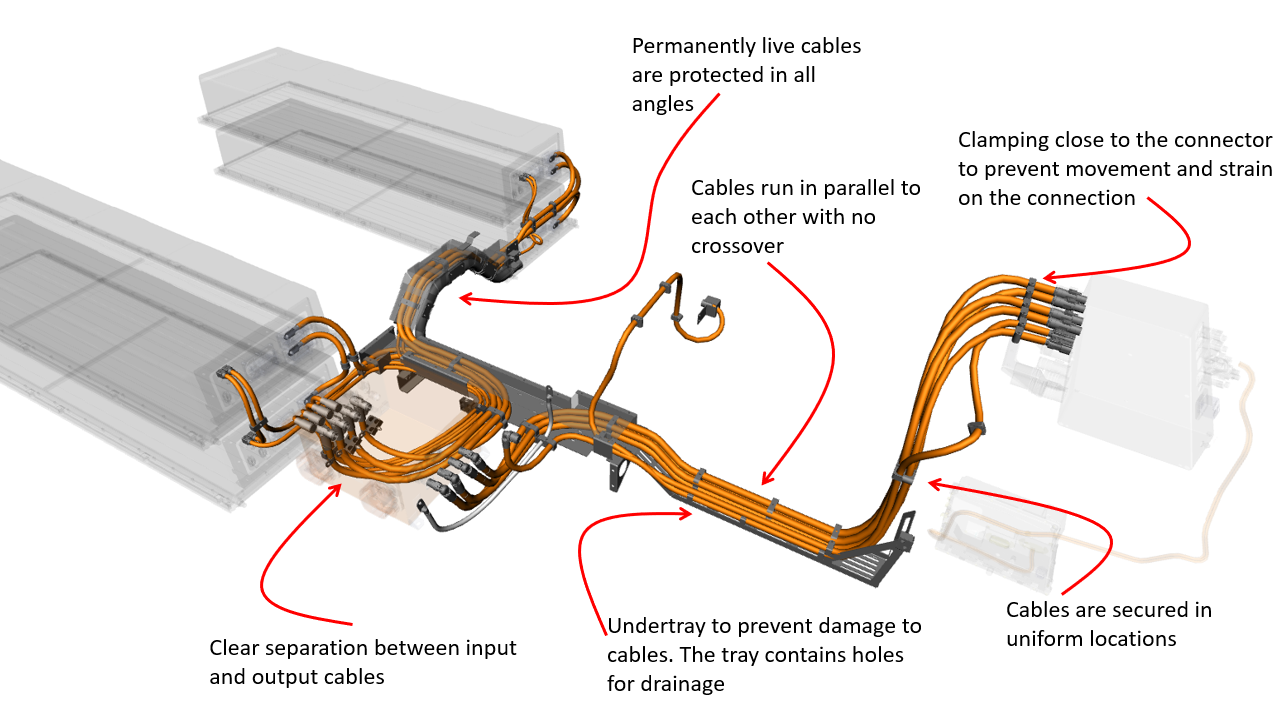
Each system needs analysing fully to ensure the optimum cable is selected. Some systems require the use of multicore cables (typically lower current systems). Whereas, the majority of the others require a single core cable for each line.

Along with the power requirements of the cable, the same considerations are essential for the designated connector. One example, is connectors can limit circuit performance due to their current carrying capacity values. An example of this could be the powertrain system. This typically will be the system with the greatest demand in both current and voltage. Consequently, producing more heat.

Heat characteristics offer another variable to be considered. Heat is carried through harnesses and too short of a run can lead copper failure in the wire. As a result, some instances require a minimum run length to dissipate the heat.

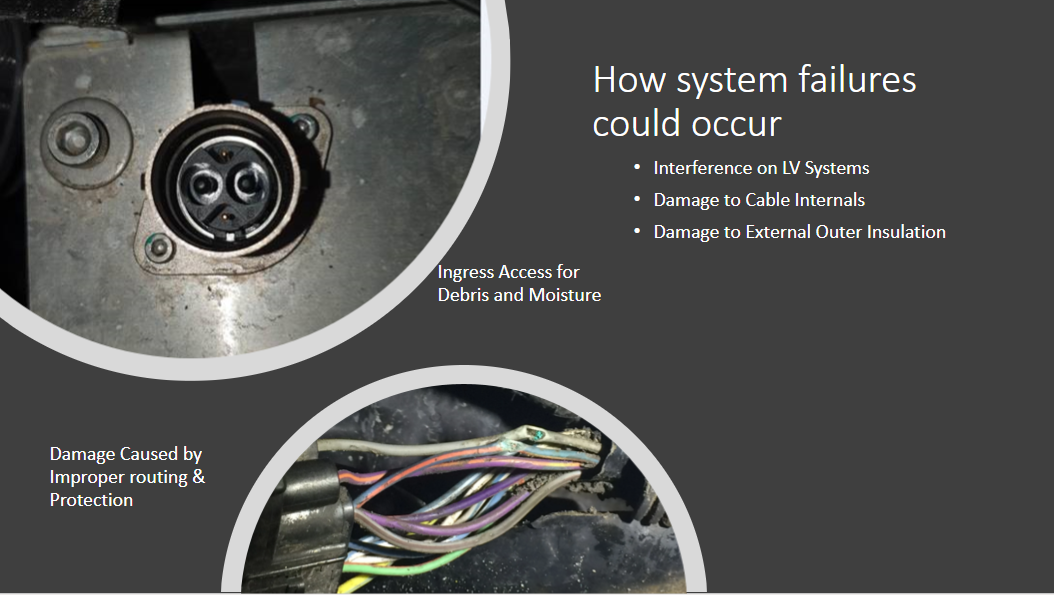
Every cable has something known as its bend radius. The bend radius stipulates the tightest the internal curve of any given bend can be before there is risk of damaging any part of the conductor. This damage can be caused by bend stress or a build-up of heat energy. Any form of damage to the harness increases susceptibility to electromagnetic interference or risk of exposed High Voltage.

All significant mechanical systems are designed, configured and refined through the use of Computer Aided Design (CAD) systems. Historically, electrical cabling tends to fall short in this aspect. This is due to many factors, including complexity and it being a none value added exercise.

However, with the turn of Electric Vehicles, cable size has replaced fuel pipes. The footprint, mass properties and installation requirements mean they can no longer be overshadowed by other systems in a vehicle’s configuration.

Factors to consider are:

             Not route too close to Low Voltage cables to mitigate the potential of Electric ‘noise’ to low voltage systems.

              Route cables with opposing current flow next to each other.

              Support for the weight of the cables.

              Securement of the cables.

   Cable specific bend radiuses.

The next level of the development is to lay the cables into a physical vehicle. The design in CAD was utilised as an installation guide.


The key challenge faced when installing the system is the rigidity of the cables.

Due to the construction of the cable having multiple core layers, it proved challenging to ensure the cables were installed smoothly.

A factor of this is the securement of the cables at multiple sections of a bend. This is to ensure any bend does not kink further down the line, nor push the cable out to cause a foul condition further down the run. These differences between real world installation and a CAD installation occur due to the physical flexibility of a cable.

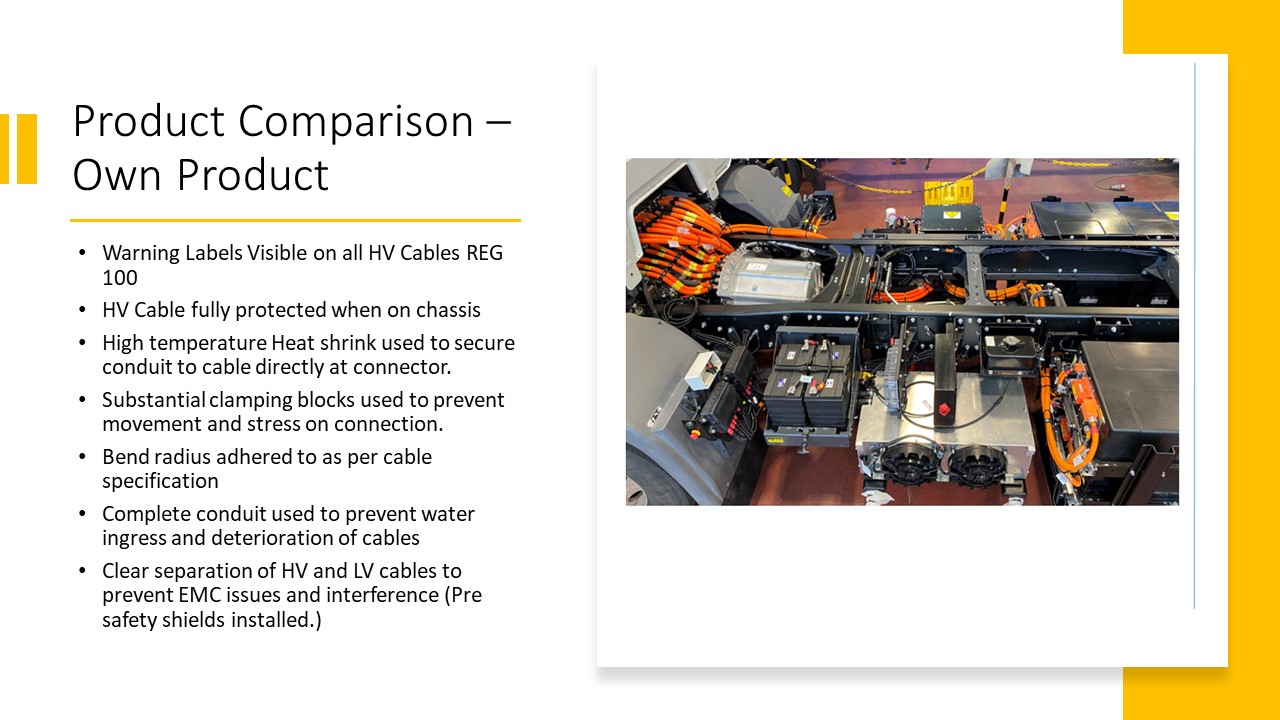
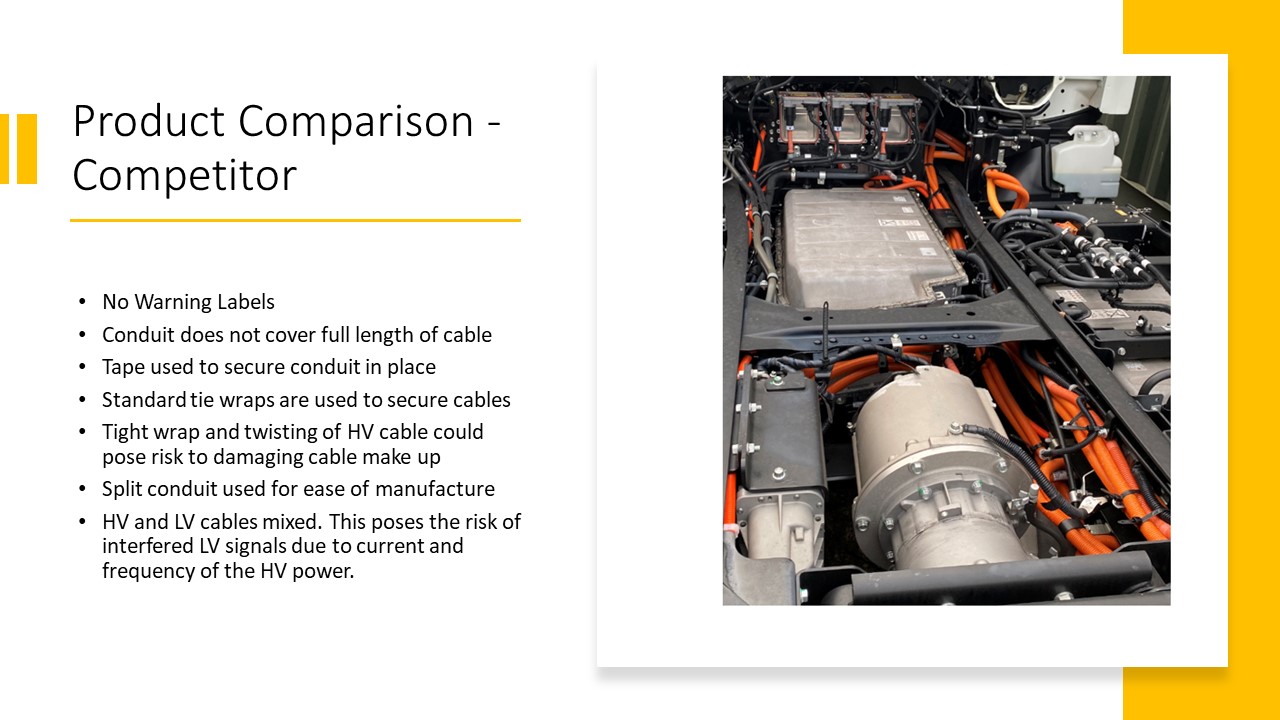
Nonetheless, the opportunity was presented to view a current competitors EV. I took great interest in how other Engineers tackled the challenge of routing a High Voltage architecture. Below identifies a comparison between the product I designed and a competitor’s installation.

Why are High Voltage cables orange?

High Voltage cables must be easily identifiable by the use of bright colours (as discussed in ISO19642-5, Annex B).

The use of bright colouring highlights the hazards associated with the energy within the cable.  

The base colour used is Munsell 8.75R5.75/12.5.

When systems are wired in parallel, the opportunity for imbalance to the system can occur. Imbalance will lead to issues such as exaggerated wear on one battery pack due to one having a lower line resistance due to the cable length. Moreover, the threshold imbalance has to be understood. This is done by using the hypothetical run length by the resistivity of copper. This result is then divided by the cross-sectional area. The difference is calculated by subtracting the smallest resistance from the largest. The conversion into percentage form is for the ease of reference. The length difference will be primarily down to connector and component positioning. If these values are greater than component specifications then system layouts need to be reconsidered.
With these factors in mind, the installation was developed. All cabling runs within a tray support system and each cable is protected in orange conduit to prevent fouling. At both ends of the line, there is a warning label with the following information:               ISO specific warning symbol (lightening bolt in a triangle).               A warning phrase, such as ‘DANGER’.               Purpose of the harness.               Maximum voltage that could be in the line at any one time. This is all to aid in the assembly operations and to support a service operator in diagnosing any potential line failures. The CAD configuration was revised on multiple occasions to ensure all parties were satisfied with the installation. The benefit of designing on CAD is it allows us to have a high level of confidence for the installation. It also prevents the potential damage to systems and offers greater flexibility of trialling multiple options.
As with all developments, opportunities for improvements in means of cost reduction, connector improvements and alternative strategies. Currently on the market, there are a limited quantity of conduit termination by means of back shells. The current strategy is to overlap heat shrink to offer protection. However, this could open due to weathering. A back shell offers a neater and more permanent installation. Where the installation uses thinner cables (6mm² or less), a cost reduction could be identified if two cables are ran within one conduit and where the connections are terminated, “Y or T shaped connectors could be used, similar to what is offered on low voltages harnesses.
Any system is susceptible to failures. However, learning from previous lessons allows for the mitigation on future designs. After studying typical harness failures across a variety of vehicles, it is visible certain aspects of routing require key focus. These areas include any dynamic (moveable) areas on the product. This requires slack for the range of movement. The amount of slack used needs to not be too excessive to cause issues such trapped cables. Areas where there is greater heat, excessive temperature changes or opportunity to be exposed to oils or fluids require extra protection. Temperature, moisture and chemicals will degrade the silicone insulative layers. A mitigation for this design is to ensure all cables on the chassis is protected by conduit. When harness failures occur, the result is inconsistent. The failure mode could range from an intermittent, none invasive system malfunction to a thermal incident. Unfortunately, with the hazards associated with High Voltage, high energy systems, failures as extreme as the latter are a greater risk. This means significant precautions, including the design and installation discussed above are required.
EXTERNAL LINK: Folllow the link for the official DAF fully Electric LF DAF LF Electric for ‘zero emission’ urban distribution - DAF Trucks N.V.
Page saved!
Add default layout Add text Add image/symbol Add audio/video
View page
CloseCanvas height (pixels)
Background colour
 
Background image (max: 2mb)
Clear
Drop files here to upload
CloseEmail Website address Facebook Twitter Instagram Profile image
Close
Slide 1 image (max 2mb)
Clear
Drop files here to upload
Slide 1 video (YouTube/Vimeo embed code)
Clear
Image 1 Caption
Slide 2 image (max 2mb)
Clear
Drop files here to upload
Slide 2 video (YouTube/Vimeo embed code)
Clear
Image 2 Caption
Slide 3 image (max 2mb)
Clear
Drop files here to upload
Slide 3 video (YouTube/Vimeo embed code)
Clear
Image 3 Caption
Slide 4 image (max 2mb)
Clear
Drop files here to upload
Slide 4 video (YouTube/Vimeo embed code)
Clear
Image 4 Caption
Slide 5 image (max 2mb)
Clear
Drop files here to upload
Slide 5 video (YouTube/Vimeo embed code)
Clear
Image 5 Caption
Slide 6 image (max 2mb)
Clear
Drop files here to upload
Slide 6 video (YouTube/Vimeo embed code)
Clear
Image 6 Caption
Slide 7 image (max 2mb)
Clear
Drop files here to upload
Slide 7 video (YouTube/Vimeo embed code)
Clear
Image 7 Caption
Slide 8 image (max 2mb)
Clear
Drop files here to upload
Slide 8 video (YouTube/Vimeo embed code)
Clear
Image 8 Caption
Slide 9 image (max 2mb)
Clear
Drop files here to upload
Slide 9 video (YouTube/Vimeo embed code)
Clear
Image 9 Caption
Slide 10 image (max 2mb)
Clear
Drop files here to upload
Slide 20 video (YouTube/Vimeo embed code)
Clear
Image 10 Caption
Caption font Text
CloseImage (max size: 2mb)
Clear
Or drag a symbol into the upload area
Image description/alt-tag Image caption Image link Rollover Image (max size: 2mb)
Clear
Or drag a symbol into the upload area
Border colour
Rotate
Skew (x-axis)
Skew (y-axis)
CloseVideo/audio player embed code (YouTube/Vimeo/Soundcloud)
Rotate
CloseText Rollover Text Background colour
Rotate
CloseVideo/audio player embed code (YouTube/Vimeo/Soundcloud)
Rotate
CloseVideo/audio player embed code (YouTube/Vimeo/Soundcloud)
Rotate
CloseImage (max size: 2mb)
Clear
Drop files here to upload
Or drag a symbol into the upload area
Image description/alt-tag Image caption Image link Rollover Image (max size: 2mb)
Clear
Drop files here to upload
Or drag a symbol into the upload area
Border colour
 
Rotate
Skew (x-axis)
Skew (y-axis)
CloseText Rollover Text Background colour
 
Rotate
CloseText Rollover Text Background colour
 
Rotate
CloseVideo/audio player embed code (YouTube/Vimeo/Soundcloud)
Rotate
CloseVideo/audio player embed code (YouTube/Vimeo/Soundcloud)
Rotate
CloseImage (max size: 2mb)
Clear
Drop files here to upload
Or drag a symbol into the upload area
Image description/alt-tag Image caption Image link Rollover Image (max size: 2mb)
Clear
Drop files here to upload
Or drag a symbol into the upload area
Border colour
 
Rotate
Skew (x-axis)
Skew (y-axis)
CloseImage (max size: 2mb)
Clear
Drop files here to upload
Or drag a symbol into the upload area
Image description/alt-tag Image caption Image link Rollover Image (max size: 2mb)
Clear
Drop files here to upload
Or drag a symbol into the upload area
Border colour
 
Rotate
Skew (x-axis)
Skew (y-axis)
CloseImage (max size: 2mb)
Clear
Drop files here to upload
Or drag a symbol into the upload area
Image description/alt-tag Image caption Image link Rollover Image (max size: 2mb)
Clear
Drop files here to upload
Or drag a symbol into the upload area
Border colour
 
Rotate
Skew (x-axis)
Skew (y-axis)
CloseText Rollover Text Background colour
 
Rotate
CloseImage (max size: 2mb)
Clear
Drop files here to upload
Or drag a symbol into the upload area
Image description/alt-tag Image caption Image link Rollover Image (max size: 2mb)
Clear
Drop files here to upload
Or drag a symbol into the upload area
Border colour
 
Rotate
Skew (x-axis)
Skew (y-axis)
CloseImage (max size: 2mb)
Clear
Drop files here to upload
Or drag a symbol into the upload area
Image description/alt-tag Image caption Image link Rollover Image (max size: 2mb)
Clear
Drop files here to upload
Or drag a symbol into the upload area
Border colour
 
Rotate
Skew (x-axis)
Skew (y-axis)
CloseImage (max size: 2mb)
Clear
Drop files here to upload
Slide2.JPG
0.1 MB
Slide2.JPG
Or drag a symbol into the upload area
Image description/alt-tag Image caption Image link Rollover Image (max size: 2mb)
Clear
Drop files here to upload
Or drag a symbol into the upload area
Border colour
 
Rotate
Skew (x-axis)
Skew (y-axis)
CloseText Rollover Text Background colour
 
Rotate
CloseImage (max size: 2mb)
Clear
Drop files here to upload
Or drag a symbol into the upload area
Image description/alt-tag Image caption Image link Rollover Image (max size: 2mb)
Clear
Drop files here to upload
Or drag a symbol into the upload area
Border colour
 
Rotate
Skew (x-axis)
Skew (y-axis)
CloseImage (max size: 2mb)
Clear
Drop files here to upload
Or drag a symbol into the upload area
Image description/alt-tag Image caption Image link Rollover Image (max size: 2mb)
Clear
Drop files here to upload
Or drag a symbol into the upload area
Border colour
 
Rotate
Skew (x-axis)
Skew (y-axis)
CloseImage (max size: 2mb)
Clear
Drop files here to upload
Or drag a symbol into the upload area
Image description/alt-tag Image caption Image link Rollover Image (max size: 2mb)
Clear
Drop files here to upload
Or drag a symbol into the upload area
Border colour
 
Rotate
Skew (x-axis)
Skew (y-axis)
CloseText Rollover Text Background colour
 
Rotate
CloseText Rollover Text Background colour
 
Rotate
CloseText Rollover Text Background colour
 
Rotate
CloseVideo/audio player embed code (YouTube/Vimeo/Soundcloud)
Rotate
CloseVideo/audio player embed code (YouTube/Vimeo/Soundcloud)
Rotate
CloseText Rollover Text Background colour
 
Rotate
CloseText Rollover Text Background colour
 
Rotate
CloseImage (max size: 2mb)
Clear
Drop files here to upload
Or drag a symbol into the upload area
Image description/alt-tag Image caption Image link Rollover Image (max size: 2mb)
Clear
Drop files here to upload
Or drag a symbol into the upload area
Border colour
 
Rotate
Skew (x-axis)
Skew (y-axis)
CloseText Rollover Text Background colour
 
Rotate
CloseImage (max size: 2mb)
Clear
Drop files here to upload
Or drag a symbol into the upload area
Image description/alt-tag Image caption Image link Rollover Image (max size: 2mb)
Clear
Drop files here to upload
Or drag a symbol into the upload area
Border colour
 
Rotate
Skew (x-axis)
Skew (y-axis)
CloseImage (max size: 2mb)
Clear
Drop files here to upload
Or drag a symbol into the upload area
Image description/alt-tag Image caption Image link Rollover Image (max size: 2mb)
Clear
Drop files here to upload
Or drag a symbol into the upload area
Border colour
 
Rotate
Skew (x-axis)
Skew (y-axis)
CloseText Rollover Text Background colour
 
Rotate
CloseText Rollover Text Background colour
 
Rotate
CloseText Rollover Text Background colour
 
Rotate
CloseText Rollover Text Background colour
 
Rotate
CloseImage (max size: 2mb)
Clear
Drop files here to upload
Or drag a symbol into the upload area
Image description/alt-tag Image caption Image link Rollover Image (max size: 2mb)
Clear
Drop files here to upload
Or drag a symbol into the upload area
Border colour
 
Rotate
Skew (x-axis)
Skew (y-axis)
CloseImage (max size: 2mb)
Clear
Drop files here to upload
Slide5.JPG
0.1 MB
Slide5.JPG
Or drag a symbol into the upload area
Image description/alt-tag Image caption Image link Rollover Image (max size: 2mb)
Clear
Drop files here to upload
Or drag a symbol into the upload area
Border colour
 
Rotate
Skew (x-axis)
Skew (y-axis)
CloseImage (max size: 2mb)
Clear
Drop files here to upload
Or drag a symbol into the upload area
Image description/alt-tag Image caption Image link Rollover Image (max size: 2mb)
Clear
Drop files here to upload
Or drag a symbol into the upload area
Border colour
 
Rotate
Skew (x-axis)
Skew (y-axis)
CloseImage (max size: 2mb)
Clear
Drop files here to upload
Or drag a symbol into the upload area
Image description/alt-tag Image caption Image link Rollover Image (max size: 2mb)
Clear
Drop files here to upload
Or drag a symbol into the upload area
Border colour
 
Rotate
Skew (x-axis)
Skew (y-axis)
CloseImage (max size: 2mb)
Clear
Drop files here to upload
Or drag a symbol into the upload area
Image description/alt-tag Image caption Image link Rollover Image (max size: 2mb)
Clear
Drop files here to upload
Or drag a symbol into the upload area
Border colour
 
Rotate
Skew (x-axis)
Skew (y-axis)
CloseImage (max size: 2mb)
Clear
Drop files here to upload
Or drag a symbol into the upload area
Image description/alt-tag Image caption Image link Rollover Image (max size: 2mb)
Clear
Drop files here to upload
Or drag a symbol into the upload area
Border colour
 
Rotate
Skew (x-axis)
Skew (y-axis)
CloseImage (max size: 2mb)
Clear
Drop files here to upload
Or drag a symbol into the upload area
Image description/alt-tag Image caption Image link Rollover Image (max size: 2mb)
Clear
Drop files here to upload
Or drag a symbol into the upload area
Border colour
 
Rotate
Skew (x-axis)
Skew (y-axis)
CloseText Rollover Text Background colour
 
Rotate
CloseImage (max size: 2mb)
Clear
Drop files here to upload
Or drag a symbol into the upload area
Image description/alt-tag Image caption Image link Rollover Image (max size: 2mb)
Clear
Drop files here to upload
Or drag a symbol into the upload area
Border colour
 
Rotate
Skew (x-axis)
Skew (y-axis)
CloseImage (max size: 2mb)
Clear
Drop files here to upload
Or drag a symbol into the upload area
Image description/alt-tag Image caption Image link Rollover Image (max size: 2mb)
Clear
Drop files here to upload
Or drag a symbol into the upload area
Border colour
 
Rotate
Skew (x-axis)
Skew (y-axis)
CloseImage (max size: 2mb)
Clear
Drop files here to upload
Or drag a symbol into the upload area
Image description/alt-tag Image caption Image link Rollover Image (max size: 2mb)
Clear
Drop files here to upload
Or drag a symbol into the upload area
Border colour
 
Rotate
Skew (x-axis)
Skew (y-axis)
CloseText Rollover Text Background colour
 
Rotate
CloseText Rollover Text Background colour
 
Rotate
CloseImage (max size: 2mb)
Clear
Drop files here to upload
Or drag a symbol into the upload area
Image description/alt-tag Image caption Image link Rollover Image (max size: 2mb)
Clear
Drop files here to upload
Or drag a symbol into the upload area
Border colour
 
Rotate
Skew (x-axis)
Skew (y-axis)
CloseImage (max size: 2mb)
Clear
Drop files here to upload
Or drag a symbol into the upload area
Image description/alt-tag Image caption Image link Rollover Image (max size: 2mb)
Clear
Drop files here to upload
Or drag a symbol into the upload area
Border colour
 
Rotate
Skew (x-axis)
Skew (y-axis)
CloseImage (max size: 2mb)
Clear
Drop files here to upload
Or drag a symbol into the upload area
Image description/alt-tag Image caption Image link Rollover Image (max size: 2mb)
Clear
Drop files here to upload
Or drag a symbol into the upload area
Border colour
 
Rotate
Skew (x-axis)
Skew (y-axis)
CloseImage (max size: 2mb)
Clear
Drop files here to upload
Or drag a symbol into the upload area
Image description/alt-tag Image caption Image link Rollover Image (max size: 2mb)
Clear
Drop files here to upload
Or drag a symbol into the upload area
Border colour
 
Rotate
Skew (x-axis)
Skew (y-axis)
CloseImage (max size: 2mb)
Clear
Drop files here to upload
Or drag a symbol into the upload area
Image description/alt-tag Image caption Image link Rollover Image (max size: 2mb)
Clear
Drop files here to upload
Or drag a symbol into the upload area
Border colour
 
Rotate
Skew (x-axis)
Skew (y-axis)
CloseImage (max size: 2mb)
Clear
Drop files here to upload
Or drag a symbol into the upload area
Image description/alt-tag Image caption Image link Rollover Image (max size: 2mb)
Clear
Drop files here to upload
Or drag a symbol into the upload area
Border colour
 
Rotate
Skew (x-axis)
Skew (y-axis)
CloseImage (max size: 2mb)
Clear
Drop files here to upload
Or drag a symbol into the upload area
Image description/alt-tag Image caption Image link Rollover Image (max size: 2mb)
Clear
Drop files here to upload
Or drag a symbol into the upload area
Border colour
 
Rotate
Skew (x-axis)
Skew (y-axis)
CloseImage (max size: 2mb)
Clear
Drop files here to upload
Or drag a symbol into the upload area
Image description/alt-tag Image caption Image link Rollover Image (max size: 2mb)
Clear
Drop files here to upload
Or drag a symbol into the upload area
Border colour
 
Rotate
Skew (x-axis)
Skew (y-axis)
CloseImage (max size: 2mb)
Clear
Drop files here to upload
Or drag a symbol into the upload area
Image description/alt-tag Image caption Image link Rollover Image (max size: 2mb)
Clear
Drop files here to upload
Or drag a symbol into the upload area
Border colour
 
Rotate
Skew (x-axis)
Skew (y-axis)
CloseImage (max size: 2mb)
Clear
Drop files here to upload
Or drag a symbol into the upload area
Image description/alt-tag Image caption Image link Rollover Image (max size: 2mb)
Clear
Drop files here to upload
Or drag a symbol into the upload area
Border colour
 
Rotate
Skew (x-axis)
Skew (y-axis)
CloseImage (max size: 2mb)
Clear
Drop files here to upload
Or drag a symbol into the upload area
Image description/alt-tag Image caption Image link Rollover Image (max size: 2mb)
Clear
Drop files here to upload
Or drag a symbol into the upload area
Border colour
 
Rotate
Skew (x-axis)
Skew (y-axis)
CloseImage (max size: 2mb)
Clear
Drop files here to upload
Or drag a symbol into the upload area
Image description/alt-tag Image caption Image link Rollover Image (max size: 2mb)
Clear
Drop files here to upload
Or drag a symbol into the upload area
Border colour
 
Rotate
Skew (x-axis)
Skew (y-axis)
CloseImage (max size: 2mb)
Clear
Drop files here to upload
Or drag a symbol into the upload area
Image description/alt-tag Image caption Image link Rollover Image (max size: 2mb)
Clear
Drop files here to upload
Or drag a symbol into the upload area
Border colour
 
Rotate
Skew (x-axis)
Skew (y-axis)
CloseImage (max size: 2mb)
Clear
Drop files here to upload
Or drag a symbol into the upload area
Image description/alt-tag Image caption Image link Rollover Image (max size: 2mb)
Clear
Drop files here to upload
Or drag a symbol into the upload area
Border colour
 
Rotate
Skew (x-axis)
Skew (y-axis)
CloseImage (max size: 2mb)
Clear
Drop files here to upload
Or drag a symbol into the upload area
Image description/alt-tag Image caption Image link Rollover Image (max size: 2mb)
Clear
Drop files here to upload
Or drag a symbol into the upload area
Border colour
 
Rotate
Skew (x-axis)
Skew (y-axis)
CloseImage (max size: 2mb)
Clear
Drop files here to upload
Or drag a symbol into the upload area
Image description/alt-tag Image caption Image link Rollover Image (max size: 2mb)
Clear
Drop files here to upload
Or drag a symbol into the upload area
Border colour
 
Rotate
Skew (x-axis)
Skew (y-axis)
CloseText Rollover Text Background colour
 
Rotate
CloseText Rollover Text Background colour
 
Rotate
CloseText Rollover Text Background colour
 
Rotate
CloseImage (max size: 2mb)
Clear
Drop files here to upload
Or drag a symbol into the upload area
Image description/alt-tag Image caption Image link Rollover Image (max size: 2mb)
Clear
Drop files here to upload
Or drag a symbol into the upload area
Border colour
 
Rotate
Skew (x-axis)
Skew (y-axis)
CloseImage (max size: 2mb)
Clear
Drop files here to upload
Or drag a symbol into the upload area
Image description/alt-tag Image caption Image link Rollover Image (max size: 2mb)
Clear
Drop files here to upload
Or drag a symbol into the upload area
Border colour
 
Rotate
Skew (x-axis)
Skew (y-axis)
CloseImage (max size: 2mb)
Clear
Drop files here to upload
Or drag a symbol into the upload area
Image description/alt-tag Image caption Image link Rollover Image (max size: 2mb)
Clear
Drop files here to upload
Or drag a symbol into the upload area
Border colour
 
Rotate
Skew (x-axis)
Skew (y-axis)
CloseText Rollover Text Background colour
 
Rotate
CloseText Rollover Text Background colour
 
Rotate
CloseText Rollover Text Background colour
 
Rotate